|
|
Scanner FAQ
Wavelink Symbol scanner official downloads page here
(common downoads are also listed on the downloads page of this site)
show
hide
SCANNER-01 - Auditing your scanners and Wavelink server
Details discovered here should be recorded on the Tracemaster Site Audit document linked
in FAQ BASIC-04.

(1) Wavelink Server Details
---------------------------

Go to the Wavelink server PC

(a) IP Address and Computer Name
- find these details for the Wavelink server PC using FAQ BASIC03

(b) Stock Control and Pallet Packer ports
- go to the Wavelink server PC, and go to Start > Programs > Wavelink Studio > Wavelink Administrator
- click the leftmost icon in the toolbar and start the monitor for 'localhost' by clicking 'connect'
- under 'TCP/IP Network', there should two ports entries listed
- for each port,
    - double click the entry to open the properties window
    - under 'General Monitor Information', all periods should read '00:00:00' and 'initialise monitor
      on server startup' should be ticked
    - under 'Application Information', the text should read 'C:\Program Files\Harvestmaster\HTM_PDE_Stock_Control.exe'
      or start with 'C:\Program Files\Harvestmaster\HTM_PDE_PalletPack_...' (there are 4 possibilities for pallet packing)
    - record the port number and whether it is assigned to Pallet Packing or Stock Control

(c) License Codes
- with Wavelink Administrator still open, go to Utilities > Authorization
- scroll down the 'Platform Version' list and choose 'Wavelink Studio 95/NT', and record any license information displayed
- now choose the item following: 'Wavelink Studio User Pack', and record any license information displayed

(2) Wireless Network Details
----------------------------

You should have this information recorded already, in case of needing to reconfigure a scanner.
If not, your IT person should be able to assist.
Please record the details on the audit document.

(3) List of Scanners (Model Code, Label, OS Type and IP Address)
----------------------------------------------------------------

- we recommend placing a label with an identifying number (eg. 01, 02, etc) on it somewhere on the scanner, or writing a
  number on it in permanent marker (the front of the barcode reader block seems to be the best spot)
  This is so the different scanners can be identified, although they may be identical models.
- the scanner model code is on the sticker on the back of the unit. It is small and a magnifying glass may be
  required to read it. There is also a serial number listed inside the battery compartment, under the battery.
- the procedure for finding which operating system the scanner is running varies between models.
  in general, go to Control Panel > Settings, and then a System tab or icon. The correct window will list
  the Operating system, eg. CE 5.0 build 2350
- likewise the procedure for viewing the IP address varies between models.
show
hide
SCANNER-02 - Loading the Wavelink client onto the scanner and setting up the wireless network
Loading the Wavelink client
---------------------------

1. Ensure Microsoft ActiveSync is downloaded and installed

2. Connect the cradle to the PC with a USB cable.  Seat the unit in the cradle.  ActiveSync should start up.
   Choose a guest relationship, if asked.

For MC3000 series (includes MC3090, MC3070)

 3. Double click the file 'wlc_sym_3000_ce50_5_32_13_as.exe' on the CD.  Install the program onto the PC,
    accepting the default values. The scanner install is a separate program which will start up at the end.

 4. When the scanner install program starts up, click the 'application only' button to install the wavelink
    client to the MC3090. Wait for the file copy to finish on the scanner.

For MC9000 series (includes MC9060)

 3. Double click the file 'wlc_sym_3000_ce50_5_32_13_as.exe' on the CD.  Install the program onto the PC,
    accepting the default values. When prompted, click OK on the scanner to start the install.

For all models:

5. Start the Wavelink Studio Client on the scanner.  Create two profiles:
	DESCR               HOST IP                                 PORT
	Pallet Packer 	    (Wavelink Server IP as per audit)       1000
	Stock Control       (Wavelink Server IP as per audit)       2000

Configuring the Wireless Settings
--------------------------------

The configuration of the wireless settings is a complex proposition which depends on the scanner
being used and the configuration of the wireless network. There are many variables.
For this reason, when the wireless network was net up and the scanners first installed, there
should have been a detailed procedure written down. Please refer to this, and ensure that this
procedure is stored safely (please feel free to send a copy to Tracemaster support for our records !).

If you do not have a procedure written down, but you have working scanners, please write down the settings
being used at the earliest possible time.
In general the settings required are:
Settings needed:
	ESSID (network name)
	encryption settings
	authentication settings
	static IP (if present)

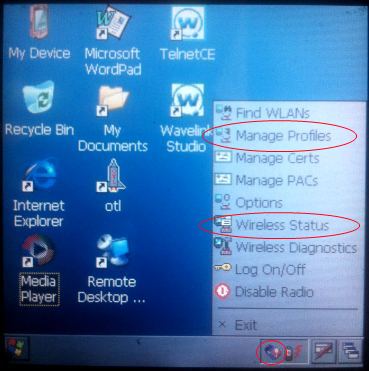
On the MC 3090, tap on the wireless icon at the bottom right of the screen to bring up the 'Wireless Options' menu.


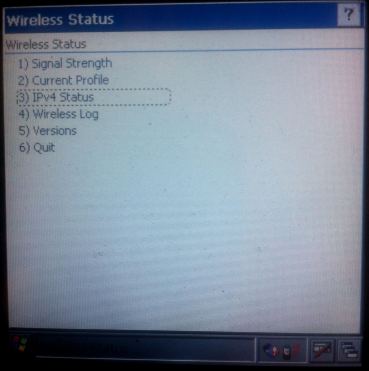
To view the active profile, select 'Wireless Status'.
The current IP address can be viewed with the 'IPv4 Status' menu option, and the current profile settings
with 'Current Profile'.


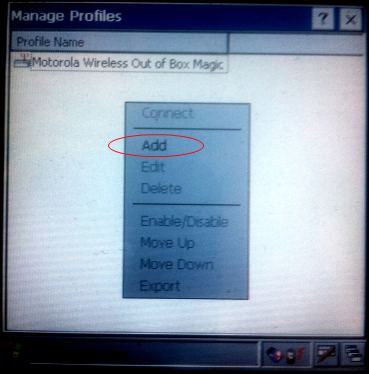
To enter a new profile, select 'manage profiles' from the Wireless Menu.
'Motorola Wireless Out of Box Magic' is the default profile.
To create a new profile, tap and hold just below that record, and the menu shown above will appear.
Choose 'Add', and a series of screens will appear stepping you through the wireless profile setup.

show
hide
SCANNER-03 - Reinstalling a Wavelink Server
Wavelink Setup:
---------------

(1) install wavelink server from here (wlstudio_37.exe), using the default settings.
(2) install the latest Tracemaster scanner programs here (HTM_PDE_221a.exe).
(3) go to Start > Programs > Wavelink Studio > Wavelink Administrator
(4) got to Utilities > Authorization and enter the registration information.
    This is in the same location on the old computer, or in your audit.
(5) click the leftmost icon in the toolbar and start the monitor for 'localhost'
(6) Double click port 2001, remove the tick from 'Initialise Monitor on server startup', and click 'Shutdown'
(7) Click the second-to-left (green) icon in the toolbar to start up a new monitor. Choose TCP/IP, port 1000,
    in the next screen click 'browse' and select the file 'C:\Program Files\Harvestmaster\HTM_PDE_Stock_Control.exe'.
    Tick 'Reset Monitor upon server startup', then leave the settings as-is and click 'Finish' in the final screen.
(8) Do the same again, this time using port 2000 and selecting
    'C:\Program Files\Harvestmaster\HTM_PDE_PalletPack_IntLabel.exe' or one of the other pallet packer products
    depending on your packing process.

This completes the Wavelink setup. Wavelink and the two monitors should automatically start up when the computer is started.

Troubleshooting:
----------------

If you open Wavelink Administrator and monitor 'localhost', it shows connections to the server in real time as they happen,
which can be useful for troubleshooting.

If you need to test that the Wavelink server is configured correctly (particularly when wireless scanners are not working),
you can use the 'Virtual Client' in Start > Programs > Wavelink Studio > Wavelink Virtual Client.
Click 'configure' and create an assignment to a port and IP address ('host' doesn't matter), set it as current, set the screen
to 21x16, and then you should be able to use the stock control and pallet packer programs as if you were on a scanner.

Problems with non-connection are caused by
- firewalls (turn off to test)
- IPV6 being enabled on Windows 7 under network settings
- incorrect IP configuration of the Wireless network
- Wavelink not being installed, registered properly, or the monitors not being started as mentioned above
|

 To view the active profile, select 'Wireless Status'.
The current IP address can be viewed with the 'IPv4 Status' menu option, and the current profile settings
with 'Current Profile'.
 To enter a new profile, select 'manage profiles' from the Wireless Menu.
'Motorola Wireless Out of Box Magic' is the default profile.
To create a new profile, tap and hold just below that record, and the menu shown above will appear.
Choose 'Add', and a series of screens will appear stepping you through the wireless profile setup.
