This troubleshooting process is to be followed when a tracemaster computer cannot connect to the server.
(1) Check firewalls
-------------------
If this is the first computer other than the server to be installed, it is possible that the server
firewall is blocking all external traffic.
Firstly turn off the server firewall, and try again.
If still not working, then turn off the firewall on the computer that is not connecting, as well,
and try again.
Turning off the firewall is only a test, not a solution. The firewalls should be turned back on,
and your local IT person can fix the problem.
See: How to open the firewall port for SQL Server on Windows Server 2008, and
How to: Configure a Firewall for SQL Server Access
(Note that SQL Server 2005/2008 Express by default does not respond to external requests, but unblocking
this is covered in the installation process in the installation FAQ, so it should not be the problem)
(2) Bring up the ODBC System Datasources list
---------------------------------------------
Bring up the ODBC Settings:
Windows XP: Start > Control Panel > Administrative Tools > Data Sources (ODBC)
Windows 7: Start > search for 'odbc', choose 'Data Sources (ODBC)'
Go to the 'System DSN' tab. It should look like this:
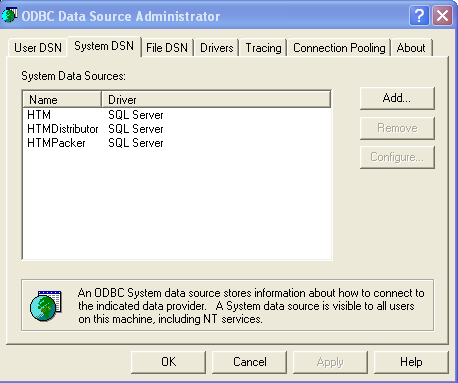 ON A 64 BIT OPERATING SYSTEM, THE LIST WILL BE BLANK
This is because you are displaying only 64 bit datasources, and Tracemaster is a 32-bit program.
To display the correct 32 bit datasource list, close the datasource you just opened, then click
Start, and type 'Run' into the earch box. Click on 'Run', and paste in the following:
%systemdrive%\Windows\SysWoW64\Odbcad32.exe
The click OK. The correct ODBC administrator window should now appear.
If the list is still blank, it is likely that Harvest Tracemaster has never been installed on this computer.
If this PC hosts a wavelink server for scanners, then two additional datasources, 'HTMPDE_PalletPacker' and
'HTMPDE_StockControl' will also be present.
(3) Check the 'HTM' Datasource
------------------------------
This datasource is used by the database troubleshooter tool. If it is not configured correctly, the tool
will not run.
(a) Double click the 'HTM' datasource.
The 'server' textbox at the bottom should contain the name of your Tracemaster SQL server (see the System
Audit FAQ or your audit document). Click next.
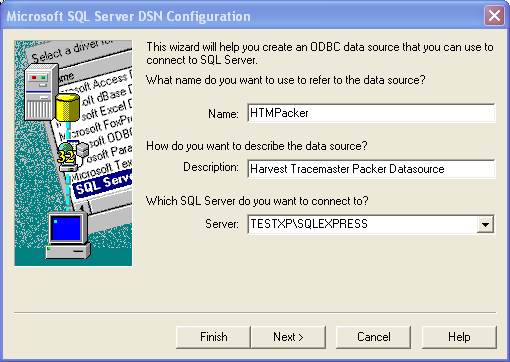 (b) Ensure SQL Server authentication mode is selected.
The login is 'sa'. Contact Tracemaster support for the password.
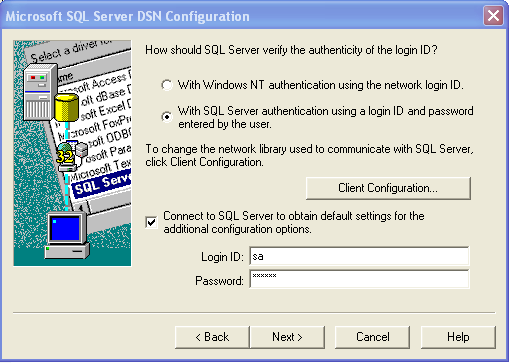 This is the point at which the datasource attempts to connect to the database. If you get to the next screen,
then the server name is correct. If you get an error, it is likely that either the server name is incorrect,
or traffic is being blocked by a firewall.
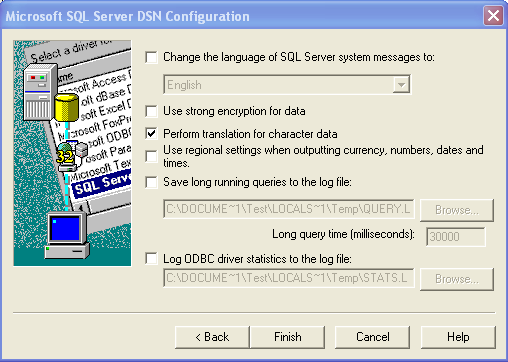
(c) The settings should look as shown below.
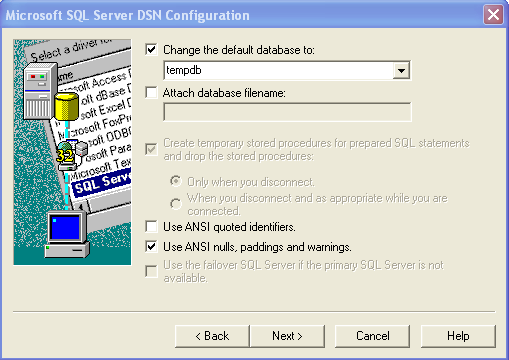 (d) The final screen needs no modification, just click 'Finish', 'Test' and 'Ok'
 (3) Check the 'HTMPacker' Datasource
------------------------------------
This datasource is the main one used by the Tracemaster program.
If you were able to configure the 'HTM' datasource, this one should be equally easy.
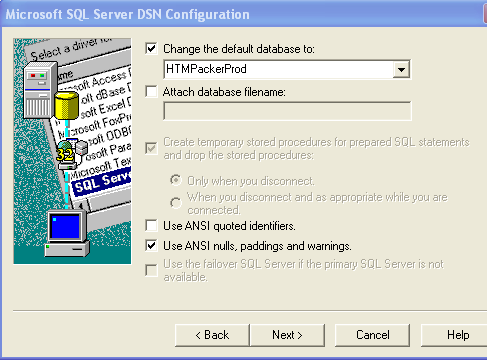
Perform steps (a), (b) and (d) as above.
The settings for step (c) are slightly different:
 (4) Scanner Datasources
-----------------------
These should be configured identically to the 'HTMPacker' datasource above.
(5) Rare Problems
-----------------
One very rare problem is where the default database is set in a datasource (step (c)
above), and after saving the datasource, on going back into it the 'change the default
database to' tick has disappeared and the list is greyed out.
Repeated settings of this will not 'stick'.
This is a problem because unless 'change the default database to' is selected, Tracemaster
cannot detect the default database.
It occurs when the default database set on the database server is the same as the one
being selected as the database in the datasource. If the default server database is somehow
set to the main production database 'HTMPackerProd' then the production database cannot be
set in the datasource, and Tracemaster will not run.
To fix the problem, start the 'Backup and Restore' utility described in the next section, and
click the button marked 'set sa default db to master'.
Overview
--------
Unless your backup software can deal with the special case of SQL Server databases, the Tracemaster
program should be set up to create a SQL database backup each time it exits.
You should still check from time to time to make sure that you backup process is working, and the
only way to effectively do this is to run your backup through a recovery process, as if you had lost
the main database.
The 'Backup and Restore' utility will automatically recover a backup file to a temporary database on
the server, and check that it contains some recognisable Tracemaster data.
This should be sufficient to ensure that the file is viable for recovery of all system data.
The utility can also be used to recover a database backup to your production database if this is
needed after server failure or some other event.
Installing and Configuring
--------------------------
(1) download the 'Backup and Restore' utility here
(2) unzip the file to your Tracemaster update folder. Open the 'BackupRestore.exe.config' file
for editing. It contains a line of text like the following:
connectionString="Data Source=SERVER_NAME;Initial Catalog=master;User ID=sa;Password=PASSWORD"
Replace SERVER_NAME with the name of your Tracemaster SQL Server, and replace PASSWORD with the
server password (contact Tracemaster support if you don't know it).
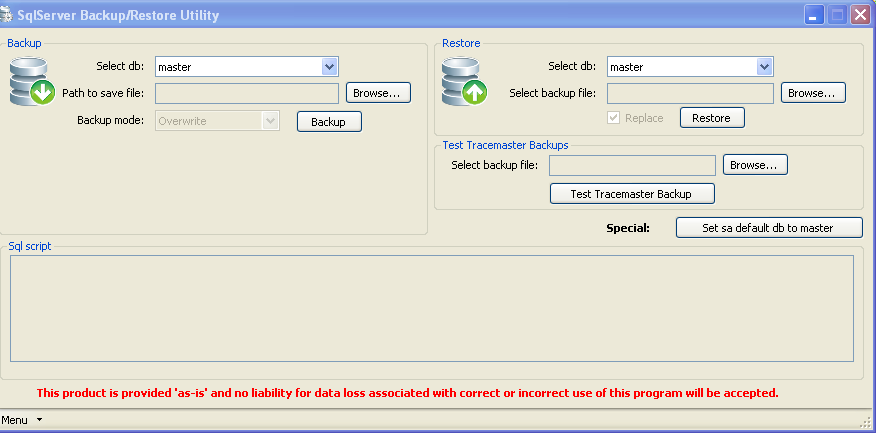
(3) run the BackupRestore.exe program. You should see a screen like this:
 Checking a Tracemaster Backup is Good
-------------------------------------
- select the backup file
- click 'Test Tracemaster Backup'
- you will receive a message telling you whether the backup passed or failed the test
Restoring Database from a Backup
--------------------------------
- select the database to overwrite
- select the backup file
- click 'Restore'
Creating a New Database
-----------------------
- enter a name for the new database
- click 'create'

 ON A 64 BIT OPERATING SYSTEM, THE LIST WILL BE BLANK
This is because you are displaying only 64 bit datasources, and Tracemaster is a 32-bit program.
To display the correct 32 bit datasource list, close the datasource you just opened, then click
Start, and type 'Run' into the earch box. Click on 'Run', and paste in the following:
%systemdrive%\Windows\SysWoW64\Odbcad32.exe
The click OK. The correct ODBC administrator window should now appear.
If the list is still blank, it is likely that Harvest Tracemaster has never been installed on this computer.
If this PC hosts a wavelink server for scanners, then two additional datasources, 'HTMPDE_PalletPacker' and
'HTMPDE_StockControl' will also be present.
(3) Check the 'HTM' Datasource
------------------------------
This datasource is used by the database troubleshooter tool. If it is not configured correctly, the tool
will not run.
(a) Double click the 'HTM' datasource.
The 'server' textbox at the bottom should contain the name of your Tracemaster SQL server (see the System
Audit FAQ or your audit document). Click next.
 (b) Ensure SQL Server authentication mode is selected.
The login is 'sa'. Contact Tracemaster support for the password.
 This is the point at which the datasource attempts to connect to the database. If you get to the next screen,
then the server name is correct. If you get an error, it is likely that either the server name is incorrect,
or traffic is being blocked by a firewall.
(c) The settings should look as shown below.
 (d) The final screen needs no modification, just click 'Finish', 'Test' and 'Ok'
 (3) Check the 'HTMPacker' Datasource
------------------------------------
This datasource is the main one used by the Tracemaster program.
If you were able to configure the 'HTM' datasource, this one should be equally easy.
Perform steps (a), (b) and (d) as above.
The settings for step (c) are slightly different:
 (4) Scanner Datasources
-----------------------
These should be configured identically to the 'HTMPacker' datasource above.
(5) Rare Problems
-----------------
One very rare problem is where the default database is set in a datasource (step (c)
above), and after saving the datasource, on going back into it the 'change the default
database to' tick has disappeared and the list is greyed out.
Repeated settings of this will not 'stick'.
This is a problem because unless 'change the default database to' is selected, Tracemaster
cannot detect the default database.
It occurs when the default database set on the database server is the same as the one
being selected as the database in the datasource. If the default server database is somehow
set to the main production database 'HTMPackerProd' then the production database cannot be
set in the datasource, and Tracemaster will not run.
To fix the problem, start the 'Backup and Restore' utility described in the next section, and
click the button marked 'set sa default db to master'.
 Checking a Tracemaster Backup is Good
-------------------------------------
- select the backup file
- click 'Test Tracemaster Backup'
- you will receive a message telling you whether the backup passed or failed the test
Restoring Database from a Backup
--------------------------------
- select the database to overwrite
- select the backup file
- click 'Restore'
Creating a New Database
-----------------------
- enter a name for the new database
- click 'create'